Range Rover Sport / L494 2017 ACCESSORY DRIVE MANUAL
303-05A: Accessory Drive - TDV6 3.0L Diesel /TDV6 3.0L Diesel - Gen 1.5/TDV6 3.0L Diesel - Gen 2
303-04A: Fuel Charging and Controls - TDV6 3.0L Diesel /TDV6 3.0L Diesel - Gen 1.5/TDV6 3.0L Diesel - Gen 2
ACCESSORY DRIVE - TDV6 3.0L DIESEL /TDV6 3.0L DIESEL - GEN 1.5/TDV6 3.0L DIESEL - GEN 2 (G1509471)
Torque Specification
A = refer to procedure for correct torque sequence
| DESCRIPTION | NM | LB-FT |
|---|---|---|
| Accessory drive belt tensioner retaining bolt | 48 | 35 |
| Accessory drive belt idler pulley retaining bolt | 48 | 35 |
| Fuel injection pump sprocket retaining nut | A | - |
| Camshaft rear hub bolt | Stage 1 - 80 Stage 2 - 80 degrees | Stage 1 - 59 Stage 2 - 80 degrees |
| Camshaft rear pulley retaining bolts | 23 | 17 |
| Rear end accessory drive belt (READ) belt tensioner retaining bolt | 23 | 17 |
ACCESSORY DRIVE - TDV6 3.0L DIESEL /TDV6 3.0L DIESEL - GEN 1.5/TDV6 3.0L DIESEL - GEN 2 (G1868447)

| ITEM | DESCRIPTION |
|---|---|
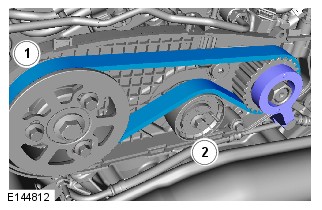
| 1 | Idler pulley |
| 2 | Accessory drive belt |
| 3 | Coolant pump |
| 4 | Idler pulley |
| 5 | Air Conditioning (A/C) compressor |
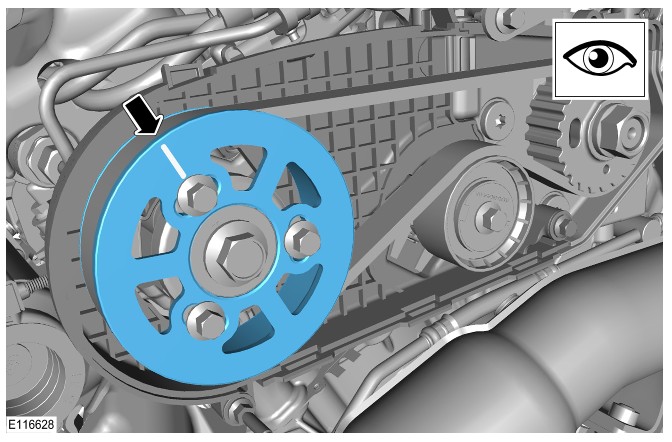
| 6 | Crankshaft pulley |
| 7 | Belt tensioner |
| 8 | Generator |
The accessory drive is a belt system powered by a pulley attached to the front of the crankshaft. The crankshaft pulley, which incorporates a torsional vibration damper, transmits power to the drive belt. A belt tensioner is incorporated into the belt run to maintain the correct tension of the drive belt. Together with idler pulleys, the belt tensioner also guide the drive belt clear of obstructions and sets the correct 'wrap-around' of the accessory component drive pulleys to ensure a slip-free drive.
The drive belt is a six-ribbed poly-V belt that drives the:
- Coolant pump
- A/C (Air Conditioning) compressor
- Generator
The belt tensioner consists of an idler pulley on the end of a spring loaded pivot arm. The pivot arm can be turned manually for removal and installation of the drive belt. The belt tensioner is calibrated to automatically maintain the correct tension in the drive belt.
Diagnosis and Testing
ACCESSORY DRIVE - TDV6 3.0L DIESEL /TDV6 3.0L DIESEL - GEN 1.5/TDV6 3.0L DIESEL - GEN 2 (G1883314)
For a detailed description of the accessory drive system and operation, refer to the relevant Description and Operation section of the workshop manual. REFER to:Accessory Drive (303-05A Accessory Drive - TDV6 3.0L Diesel /TDV6 3.0L Diesel - Gen 1.5/TDV6 3.0L Diesel - Gen 2, Description and Operation).
Diagnosis by substitution from a donor vehicle is NOT acceptable. Substitution of control modules does not guarantee confirmation of a fault and may also cause additional faults in the vehicle being checked and/or the donor vehicle.
Check and rectify basic faults before beginning diagnostic routines involving pinpoint tests.
- Verify the customer concern.
- Visually inspect for obvious signs of mechanical damage.
Visual Inspection
| MECHANICAL |
|---|
|
- If an obvious cause for an observed or reported concern is found, correct the cause (if possible) before proceeding to the next step.
If the engine is run without the auxiliary drive belts connected to eliminate driven components, diagnostic trouble codes, (DTCs) may be set which must be cleared before the vehicle is returned to the owner. The engine should not be run for more than 2-3 minutes with the belts disconnected. Failure to follow this instruction may result in damage to the vehicle.
- If the cause is not visually evident, verify the symptom and refer to the Symptom Chart, alternatively check for Diagnostic Trouble Codes (DTCs) and refer to the DTC Index.
| SYMPTOM | POSSIBLE CAUSES | ACTION |
|---|---|---|
| Noise |
|
|
| Auxiliary drive belt does not hold tension |
|
|
| SYMPTOM | POSSIBLE CAUSES | ACTION |
|---|---|---|
| Noise |
|
|
| Fuel injection pump belt does not hold tension |
|
|
| Loss of drive (with no drive to the fuel injection pump, the engine will not run) |
|
|
For a list of Diagnostic Trouble Codes (DTCs) that could be logged on this vehicle, please refer to Section 100-00. REFER to:Diagnostic Trouble Code Index - TDV6 3.0L Diesel /TDV6 3.0L Diesel - Gen 1.5/TDV6 3.0L Diesel - Gen 2, DTC: Powertrain Control Module B10A2-07 to P02D7-32 (100-00 General Information, Description and Operation).
Removal and Installation
ACCESSORY DRIVE BELT - VEHICLES WITHOUT: DYNAMIC SUSPENSION (G1509472)
- 12.10.40
- ACCESSORY DRIVE BELT - RENEW
- 3000 CC, TDV6, DIESEL, WITH DYNAMIC RESPONSE, IC
- 0.40
- USED WITHINS
- 12.10.40
- ACCESSORY DRIVE BELT - RENEW
- 3000 CC, TDV6, DIESEL, WITHOUT DYNAMIC RESPONSE, IC
- 0.10
- USED WITHINS
Removal steps in this procedure may contain installation details.
- Disconnect the battery ground cable.
Refer to:Specifications (414-00 Battery and Charging System - General Information, Specifications).
-
Refer to:Engine Cover - TDV6 3.0L Diesel /TDV6 3.0L Diesel - Gen 1.5/TDV6 3.0L Diesel - Gen 2 (501-05 Interior Trim and Ornamentation, Removal and Installation).

-
To install, reverse the removal procedure.CAUTIONS:
-
Make sure that the accessory drive belt is correctly located on each pulley.
-
Clean and inspect the accessory drive belt pulleys for damage.
-
ACCESSORY DRIVE - TDV6 3.0L DIESEL /TDV6 3.0L DIESEL - GEN 1.5/TDV6 3.0L DIESEL - GEN 2
ACCESSORY DRIVE BELT - VEHICLES WITH: DYNAMIC SUSPENSION (G1606539)
- 12.10.40
- ACCESSORY DRIVE BELT - RENEW
- 3000 CC, TDV6, DIESEL, WITH DYNAMIC RESPONSE, IC
- 0.40
- USED WITHINS
- 12.10.40
- ACCESSORY DRIVE BELT - RENEW
- 3000 CC, TDV6, DIESEL, WITHOUT DYNAMIC RESPONSE, IC
- 0.10
- USED WITHINS
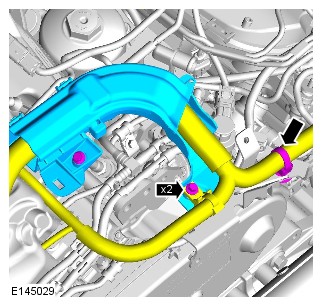
Dynamic Response system components are manufactured to very precise tolerances. It is therefore essential that absolute cleanliness is observed when working with these components. Always install blanking plugs to any open orifices or lines. Failure to follow this instruction may result in foreign matter ingress to the dynamic response system.
-
Removal steps in this procedure may contain installation details.
-
Some components shown removed for clarity.
- Disconnect the battery ground cable.
Refer to:Specifications (414-00 Battery and Charging System - General Information, Specifications).
-
Refer to:Engine Cover - TDV6 3.0L Diesel /TDV6 3.0L Diesel - Gen 1.5/TDV6 3.0L Diesel - Gen 2 (501-05 Interior Trim and Ornamentation, Removal and Installation).


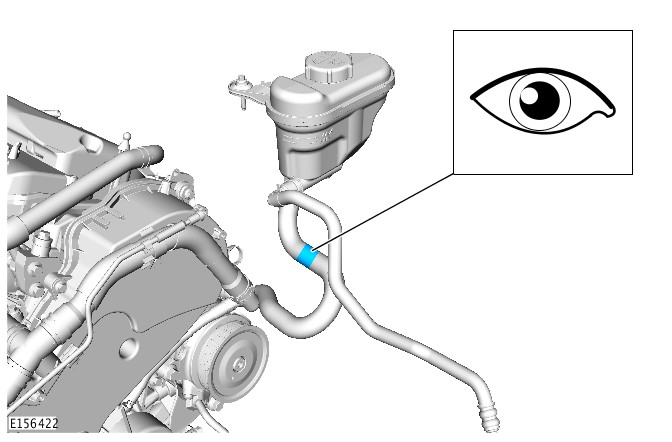
- Using a suitable suction device drain the fluid reservoir.


- To install, reverse the removal procedure.
-
- Check and top up the fluid reservoir.
- Squeeze the suction pipe several times to expel the all the air.
ACCESSORY DRIVE - TDV6 3.0L DIESEL /TDV6 3.0L DIESEL - GEN 1.5/TDV6 3.0L DIESEL - GEN 2
ACCESSORY DRIVE BELT PULLEY (G1509473)
Removal steps in this procedure may contain installation details.
- Disconnect the battery ground cable.
Refer to:Specifications (414-00 Battery and Charging System - General Information, Specifications).
-
Refer to:Engine Cover - TDV6 3.0L Diesel /TDV6 3.0L Diesel - Gen 1.5/TDV6 3.0L Diesel - Gen 2 (501-05 Interior Trim and Ornamentation, Removal and Installation).

-
To install, reverse the removal procedure.CAUTIONS:
-
Make sure that the accessory drive belt is correctly located on each pulley.
-
Clean and inspect the accessory drive belt pulleys for damage.
-
ACCESSORY DRIVE - TDV6 3.0L DIESEL /TDV6 3.0L DIESEL - GEN 1.5/TDV6 3.0L DIESEL - GEN 2
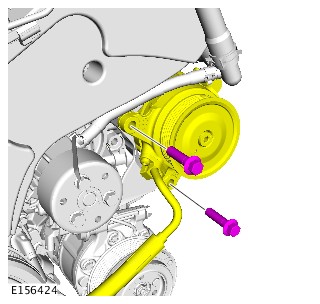
ACCESSORY DRIVE BELT TENSIONER (G1509474)
- 86.10.06
- TENSIONER - ALTERNATOR DRIVE BELT - RENEW
- 3000 CC, TDV6, DIESEL, IC
- 0.20
- USED WITHINS
Removal steps in this procedure may contain installation details.
- Disconnect the battery ground cable.
Refer to:Specifications (414-00 Battery and Charging System - General Information, Specifications).
-
Refer to:Engine Cover - TDV6 3.0L Diesel /TDV6 3.0L Diesel - Gen 1.5/TDV6 3.0L Diesel - Gen 2 (501-05 Interior Trim and Ornamentation, Removal and Installation).

-
To install, reverse the removal procedure.CAUTIONS:
-
Make sure that the accessory drive belt is correctly located on each pulley.
-
Clean and inspect the accessory drive belt pulleys for damage.
-
ACCESSORY DRIVE - TDV6 3.0L DIESEL /TDV6 3.0L DIESEL - GEN 1.5/TDV6 3.0L DIESEL - GEN 2
FUEL INJECTION PUMP PULLEY (G1509475)
- 12.10.24
- PULLEY - FUEL PUMP DRIVE - RENEW
- 3000 CC, TDV6
- 6.50
- USED WITHINS
-
Refer to:Fuel Pump (303-04A Fuel Charging and Controls - TDV6 3.0L Diesel /TDV6 3.0L Diesel - Gen 1.5/TDV6 3.0L Diesel - Gen 2, Removal and Installation).
- To install, reverse the removal procedure.
REAR END ACCESSORY DRIVE (G1509476)
- 12.10.27
- BELT - FUEL PUMP DRIVE - RENEW
- 3000 CC, TDV6
- 2.80
- USED WITHINS
SPECIAL TOOL(S)
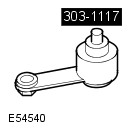
303-1117
Timing Peg, Automatic Transmission
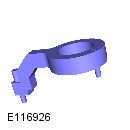
310-212
Rear End Accessory Drive (READ) belt Timing Tool
PART(S)
| STEP | PART NAME | QUANTITY |
|---|---|---|
| Installation Step 1 | Timing belt tensioner | 1 |
-
Do not carry or operate cellular phones when working on or near any fuel related components. Highly flammable vapors are always present and may ignite. Failure to follow these instructions may result in personal injury.
-
Do not carry out any repairs to the fuel system with the engine running. The fuel pressure within the system can be as high as 1650 bar (23,931 lb-sq-in). Failure to follow this instruction may result in personal injury.
-
Do not smoke or carry lighted tobacco or open flame of any type when working on or near any fuel related components. Highly flammable vapors are always present and may ignite. Failure to follow these instructions may result in personal injury.
-
This procedure involves fuel handling. Be prepared for fuel spillage at all times and always observe fuel handling precautions. Failure to follow these instructions may result in personal injury.
-
Make sure the workshop area in which the vehicle is being worked on is as clean and as dust free as possible. Foreign matter from work on clutches, brakes or from machining or welding operations can contaminate the fuel system and may result in later malfunction.
-
Always carry out the cleaning process before carrying out any repairs to the fuel injection system components. Failure to follow this instruction may result in foreign matter ingress to the fuel injection system.
-
Diesel fuel injection equipment is manufactured to very precise tolerances and fine clearances. It is therefore essential that absolute cleanliness is observed when working with these components. Always install blanking plugs to any open orifices or lines. Failure to follow this instruction may result in foreign matter ingress to the fuel injection system.
-
Do not disassemble or clean inside the fuel pump, even with an ultrasonic cleaner. Always install a new fuel pump when required.
-
Refer to:Specifications (414-00 Battery and Charging System - General Information, Specifications).
-
Refer to:Secondary Bulkhead Center Panel - TDV6 3.0L Diesel /TDV6 3.0L Diesel - Gen 1.5/TDV6 3.0L Diesel - Gen 2 (501-02 Front End Body Panels, Removal and Installation).
-
Raise and support the vehicle.WARNING:
Make sure to support the vehicle with axle stands.
-
Refer to:Starter Motor (303-06A Starting System - TDV6 3.0L Diesel /TDV6 3.0L Diesel - Gen 1.5/TDV6 3.0L Diesel - Gen 2, Removal and Installation).


-
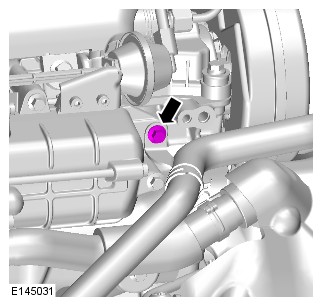
- Install the special tool.
-
Special Tool(s): 303-1117


-
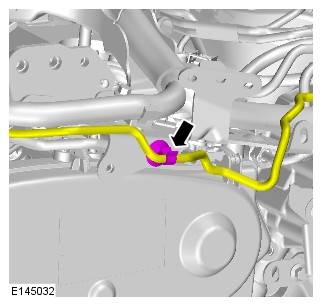
- Install the special tool.
-
Special Tool(s): 310-212


-
NOTE:
Engine shown removed for clarity.
- Remove the special tool.
-
Special Tool(s): 310-212

-
Remove the special tool.Special Tool(s): 303-1117
-
Refer to:Starter Motor (303-06A Starting System - TDV6 3.0L Diesel /TDV6 3.0L Diesel - Gen 1.5/TDV6 3.0L Diesel - Gen 2, Removal and Installation).
-
Refer to:Secondary Bulkhead Center Panel - TDV6 3.0L Diesel /TDV6 3.0L Diesel - Gen 1.5/TDV6 3.0L Diesel - Gen 2 (501-02 Front End Body Panels, Removal and Installation).
-
Refer to:Specifications (414-00 Battery and Charging System - General Information, Specifications).