Our team
We have 20 years experience with Computer system and diagnostics
From Rochdale UK we can offer you advanced Dealer level solution at fraction of the costs.
We have 20 years experience with Computer system and diagnostics
From Rochdale UK we can offer you advanced Dealer level solution at fraction of the costs.
© 2016 - 2023 Oliveston Ltd
 |  |
| Jaguar Diagnostics Range Rover Diagnostics Land Rover Diagnostics jlrsddpathfinder.com | Lock50.co.uk |
Yes the old program to work on the jags before 2005 is called IDS. We have v128 and V131 that have this software included and only runs on win XP sp3

V131 in Xp only ok for
Jags 1995 to 2010
Land rovers 2006 to 2010
Better one to use is the V163 or Higher that comes with order the latest SDD and can use jags and land rover 2006 to 2015
Yes after 2006 IDS went out and in came SDD with better interface and functions .starts from 2006 to 2015
Can use Pass thru cables from many diffrent suppliers
Activation for JLR SDD of latest version

https://www.jlridssddmongoose.com/home/activation-for-jlr-pathfinder-of-latest-version/
2015 to 2022 Cars can use Pathfinder
Some 2022 and 23 Models needs to use the Cloud Software in Topix
As long as your Jaguar is between 1995 and 2021+ and your Land Rover is between 2005-2021+, our kits will work. (OBD2 port must be present.) Note for newer models its required to have the higher version for the software to work best. check features page for years and models supported for each kit.
Older models of Jaguar are Supported in V131 or Lower Versions. IDS is the software used for these models.
The V131 Software has both the SDD & IDS.
To use IDS for the older models its required to type in the VIN number and then Identify to bring up the pop up window that loads IDS.
For models after 2006 can simply Read the Vin without entering manually to use the SDD Software as support of IDS ends in 2005 and they switched over the the SDD.
Yes Programming Functions are supported in our Kits.
You can Flash update Modules with newer firmwares or Program Virgin Parts to match the Car Vin
Yes is Supported in Some Packages we offer
Yes sure
These are Pro level kits and support software updating the ECU Softwares to newer ones.
Each Module has a Flash memory that controls how it works. Over time these get updated to enhance car functions
Normally need to visit the Dealer to do this . But now with our kits you can do from your home workshop or garage.
If the Dealer can do it so can you
at your fingertips you have the same level of software functions as the dealer
Our kits come ready with Calibration and As built files preloaded for you so you don even need to connect online to be able to Program new Virgin Parts on some systems and on others can download on demand from JLR Server using SDD online versions
The new JLR Pathfinder DOIP VCI is the only unit that will be compatible with all JLR vehicles with the new MY17 vehicle architectures. In addition to the 17MY vehicle line applications, the DOIP VCI will be capable of interfacing with 14-16MY Multi-CAN architecture vehicle lines on the Pathfinder diagnostic system.

> 17MY > Range Rover / L405
> 17MY > Range Rover Sport / L494
> 18MY > Discovery / L462
> 18MY > Range Rover Velar / L560
> 18MY > Evoque / L538
> 18MY > Discovery Sport / L550
> 18MY > XF / X260
> 18MY > XE / X760
> 18MY > F-PACE / X761
> 18MY > F-TYPE / X152
> 18MY > E-PACE / X540
> 19MY > I-PACE / X590
Panasonic Toughbook / Toughpad
JLR Approved Diagnostic Equipment For PATHFINDER to operate at its very best, the laptop or tablet being used must be an approved version/level of hardware.
Note: For further information on approved hardware to support PATHFINDER, refer to: - Administration Bulletins JAB00046 / LAB00051

Installing PATHFINDER software
https://www.jlridssddmongoose.com/home/activation-for-jlr-pathfinder-of-latest-version/
Jaguars from 1995 to 2005

Jaguar & Land Rovers from 2006 to 2017

Pathfinder for 2017 to 2022 Models
The new protocol called DOIP and the new JLR Pathfinder DOIP VCI is the only unit that will be compatible with all JLR vehicles with the new MY17 vehicle architectures. In addition to the 17MY vehicle line applications, the DOIP VCI will be capable of interfacing with 14-16MY Multi-CAN architecture vehicle lines on the Pathfinder diagnostic system.
Some of these pathfinder vehicles listed below
> 17MY > Range Rover / L405
> 17MY > Range Rover Sport / L494
> 18MY > Discovery / L462
> 18MY > Range Rover Velar / L560
> 18MY > Evoque / L538
> 18MY > Discovery Sport / L550
> 18MY > XF / X260
> 18MY > XE / X760
> 18MY > F-PACE / X761
> 18MY > F-TYPE / X152
> 18MY > E-PACE / X540
> 19MY > I-PACE / X590

You come to the right place as this is the source for All Diagnostics and Programming for Jaguar and LAnd Rover Vehicles from 1995 to 2019 and in to the future.
This is a Factory Dealer tool we are talking about for any auto electrician will be a very value tools in their kit.
You will be have the tech to program a vehicle from new or program existing built vehicles in any Jaguar Land Rover Factory All Vins supported Globally
Diagnostics Trouble shooting problems number 1 tool
Programming flashing module updates and programming new virgin modules in to car.
Edit CCF for vehicle and change specs etc etc
Before you take a Trade in you can check if Mileage is ok in Dash and BCM and other parts to confirm it.
Check and clear DTCs before selling and do module updates and custom coding if change spec before sell
Make spare keys and perform security functions
All this in house and no more wasting time calling dealers or driving to them.
All will be under your own fingertips and cur reliance
All packages come without this function as standard and you need to use your own login to to login to Topix online.
For clients outside uk who cant get this we can arrange an account for this for but for UK clients not supported
Contact us for more info
Some support plans we offer for novice users who need support
TeamViewer is an all-in-one solution for remote support, remote access, and online meetings which allows you to assist customers remotely, work with colleagues from a distance and also stay connected with your own devices or assist friends and family members. To connect the different devices, TeamViewer is using the TeamViewer ID, a session code or a Meeting ID.
To download TeamViewer, please visit our homepage at https://www.teamviewer.com and navigate to the download section by clicking on Download at the top of the page:
Alternatively, you can reach the download section via the following link: https://www.teamviewer.com/download
1. Please choose your operating system (=OS) to continue the download by clicking on the icon for your OS:
2. Please choose the correct TeamViewer module for the download. Depending on the OS, you can choose between different modules. If you are in doubt which module is the right for you, you can always start with the full version, which offers all features.
Example for the Windows-download: Scroll to find more modules
3. To start the download, click on the Download TeamViewer button
1. The download of an .exe file starts automatically after clicking the download button.
Note: Depending on the setup of your device, you will find the download in the lower part of your screen (1) or in the download file of your computer (2):
(1) Download completed (visible in the bottom of the browser window(2) The file might appear in this folder
2. Open the TeamViewer_Setup.exe file by clicking on the downloaded file (single - or double-click depending on your setup)
When you see an Open file - security warning pop-up, please continue with the installation by clicking Run. Please make sure to verify the publisher shows as TeamViewer GmbH
3. You can now install the TeamViewer software on your device or use it by running it only. Learn more about how to install TeamViewer in this article: How do I install TeamViewer on Windows 7, 8 and 10
A TeamViewer ID is a unique numeric ID assigned to each device when TeamViewer is installed. This ID is designed not to change and should remain constant even if the software is uninstalled and reinstalled.
Think of this ID like a phone number for your device. You dial the TeamViewer ID, then use the password to authenticate the connection. You can also save these ID's in the contacts list of your TeamViewer account like you would save phone numbers in the contacts list of a mobile phone.
In most of the cases a TeamViewer ID has 9 or 10 digits and you can see it on the Remote Control tab of your TeamViewer full version:
The random password is shown on the Remote Control tab of your TeamViewer application. This password is meant for spontaneous support sessions.
You can choose in the advanced options whether or when you would like TeamViewer to generate a new random password for incoming sessions (See: Random password after each session).
If you give your TeamViewer ID and the password shown underneath your ID to another person, this person will be able to connect to your device. As soon as the random password changes the person cannot access your device any longer until you give him the newly generated password.
Hint: Only allow persons you trust to remote control your device. Never give people you do not know or trust your TeamViewer ID nor password. We advise TeamViewer users to be careful with unsolicited phone calls and to not grant access to your PC to anyone you do not know or trust.
If you would like to change the random password manually you can hover with the mouse over the password field and a circle-arrow appears. Click the arrow to choose between the following options:
If you want to share your ID and password with the expert, open TeamViewer Remote.
Your ID and your password will be displayed in the main interface.


This is the link to the car and pc and come in many option
Ford VCM OBD is diagnostic programmer for vehicles 1996-2020. It can connect to various electronic control units (ECUs) and display identification, read and clear fault code memory, display and record measured values and perform actuator tests,some key programmer
The Mongoose and other J2534 compatible cables can work with SDD
for Pathfinder Doip Vci is needed as this is latest proptocols to talk with latest cars to 2021 +
Their exists many VCM types and manufactures.
Ford VCM2
JLR Mongoose
Bosch KTS
Maxidas
etc etc
some are J2534 compatible and can work with SDD only
some support DOIP and can work on Pathfinder and SDD
For JLR is few protocols in use
CAN Mongoose ok till 2012
HS CAN This is a Faster Can and JLR VCI or BOSCH DOIP supports it till 2018
DOIP JLR Bosch This is used with Latest PAthfinder software and needs the Bosch DOIP for best results starts from 2015 to 2022+
the best device that supports all of this is the original doip from Bosch that we supply
When you buy from us a Laptop or Software Licence it comes for a pre definded time only and is not unlimited.
you free soft updates to newer version during the term of your licences
This depends on you
We are here to supply tools only and how to use them or update them you have to know this and is never part of any deal we make that we supply free support to you.
Support all kinds is always paid only
https://www.jlridssddmongoose....
Use this link to see the support plans we offer
Types of support include
Remote software updates
Diagnostics DTC codes clearing
Module Flashing
custom Mods
Note we are in uk and you need to choose the type of option you need support in
Faster and whats app support cost more in realtime
lower cost is email support
Teamviwer remote login support etc
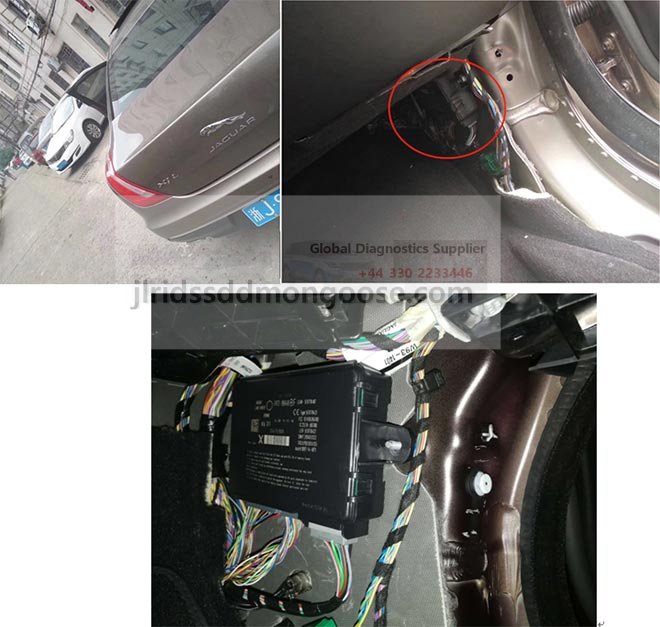
The position of the KVM is in the Evoque is in the boot on the left hand side of the car as the image below demonstrates

Relatively easy to take out and being able to program the keys.
Please see below for the image as it demonstrates below Relatively easy to take out and being able to program the keys.

Relatively easy to take out and being able to program the keys.
Please see below for the image as it demonstrates below, Relatively easy to take out and being able to program the keys.

Please see below for the image as it demonstrates below, Relatively easy to take out and being able to program the keys.

Please see below for the image as it demonstrates below, Relatively easy to take out and being able to program the keys.
Please see below for the image as it demonstrates below, Relatively easy to take out and being able to program the keys.


